This page contains explanations and documentation for flight maneuvers practiced in the T-6A Texan II aircraft.
Click on the image associated with each maneuver to watch video of an Instructor Pilot performing the maneuvers in a simulator.
The table below provides the airspeed, power (torque) settings, and required altitude for each maneuver. Click on the maneuver's name in the table to jump to the maneuver description. Some maneuvers are still pending release and do not yet have associated explanations and documentation; they are still listed here for the sake of completeness.
| Maneuver | Airspeed (Knots) | Airspeed (m/s) | Torque (Power Setting) | Altitude Required Above Current Alt (ft) | Altitude Required Below Current Alt (ft) |
| Aileron Roll | 180-220 | 92.6 - 113.18 | 80% to MAX | 1,000 | -- |
| Barrel Roll | 200-220 | 102.89 -1 13.18 | 80% to MAX | 2,000 | 1,000 |
| Loop | 230-250 | 118.32 - 128.61 | MAX | 3,000 | -- |
| Immelmann | 230-250 | 118.32 - 128.61 | MAX | 3,000 | -- |
| Split-S | 120-140 | 61.73 - 72.02 | IDLE to 80% |
500 |
2,000 (75% Torque); 2,500 (IDLE Torque) |
| Chandelle | 200-250 | 102.89 - 128.61 | MAX | 3,000 | -- |
| Cloverleaf | 200-220 | 102.89 - 113.18 | 80% to MAX | 3,000 | 1,000 |
| Cuban Eight | 230-250 | 118.32 - 128.61 | MAX | 3,000 | -- |
| Lazy Eight | 200-220 | 102.89 - 113.18 | 50 to 60% | 2,000 | 1,000 |
| Traffic Pattern Stalls (TPS) | |||||
| G-Awareness Exercise (GX) | 200-220 | 102.89 - 113.18 | MAX | -- | 1,000 |
| Intentional Spin | |||||
| Power-On Stalls (POS) | |||||
| Slow Flight | 80-95 | 41.16 - 48.87 | 60% | -- | 2,000 |
| ELP | 125 | 64.31 | 3,000 | -- | |
| Take-off | -- | -- | -- | -- | -- |
| Straight-in Pattern | -- | -- | -- | -- | -- |
| Vertical-S | -- | -- | -- | -- | -- |
Aileron Roll
Description: The objective of the Aileron Roll is to complete a 360-degree roll with a constant roll rate. The roll occurs about the longitudinal axis of the aircraft only; therefore the nose describes a point on the horizon or vertical line on the horizon.
How to: Attain briefed entry parameters. Smoothly raise the nose to 20-30 degrees nosehigh pitch attitude. Relax back stick pressure and stop nose track, then roll the aircraft left or right using coordinated aileron and rudder. The nose of the aircraft does not roll around a specific point in the roll. As the aircraft approaches wings level, neutralize the rudder and aileron, and return to level flight. In the T-6, an aileron roll to the left requires less rudder and aileron deflection than a roll to the right due to engine torque.
External Video
Cockpit GIF
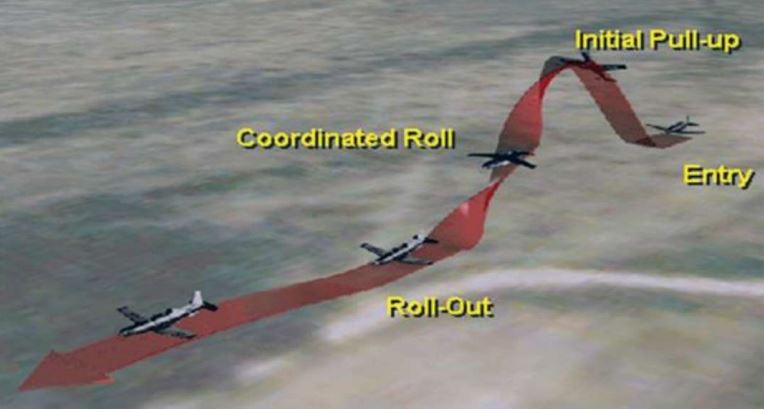
Barrel Roll
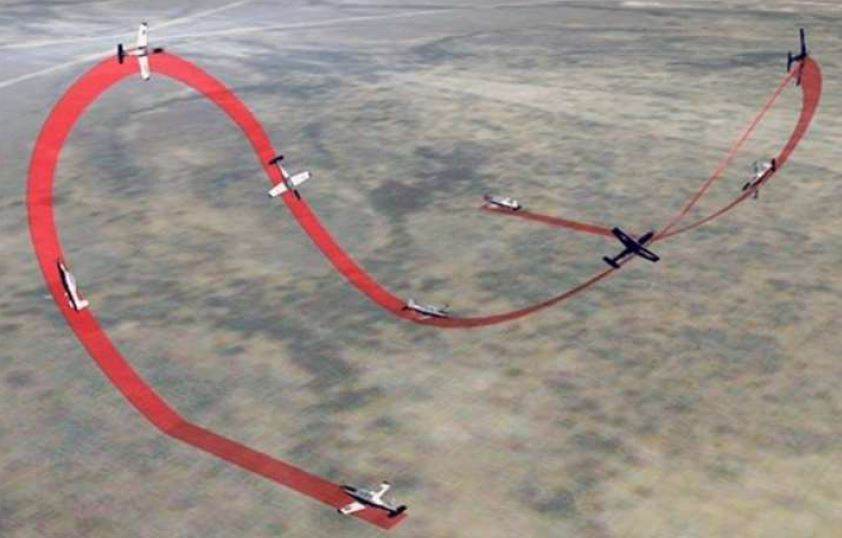
Description: The objective of the barrel roll is to maintain coordinated flight through a 360-degree roll that describes a circle around a point near the horizon. The “barrel” in the name refers to the idea that the 3D flight path describes the outer perimeter of a barrel, as opposed to an aileron roll which would fly through the center of the barrel. Definite seat pressure should be felt throughout the roll.
How to: Select a reference point, such as a cloud or landmark, up to 45 degrees off the nose of the aircraft, on or slightly above the horizon. Set briefed power and attain briefed entry airspeed with the nose of the aircraft below the horizon. Select a visual "reference point" (such as a cloud) approximately 45 degrees left or right of the nose to roll around. The distance from the reference point defines the size of the barrel roll, and it should remain constant throughout the maneuver. From level flight, increase pitch and bank. As the bank reaches 90 degrees, the aircraft should be directly above the reference point (45 degrees nose high). Passing 90 degrees of bank, relax some back pressure and increase aileron deflection to continue the roll with reduced airspeed. Back pressure must be reduced compared to the first quarter of the roll because gravity is now in the same direction as the lift vector (downward) when inverted. Plan the roll so the wings become level just as the aircraft reaches the inverted level-flight attitude. The aircraft should be displaced from the reference point the same distance as at the beginning of the maneuver. Continue the roll and apply increased elevator pressure. As the bank again reaches the 90 degrees at the bottom of the maneuver, the nose track should continue to arc around the reference point. In this last quarter of roll, increase back stick pressure because gravity is now working against the lift vector. Maintain coordinated control pressure to continue the roll so the nose completes the circle around the reference point, ending up wings level at the horizon.
External Video
Cockpit Video
Loop
Description: The objective of this maneuver is to complete a 360-degree turn in the vertical plane with constant nose track. Because it is executed in a single plane, the elevator is the principle control surface. Ailerons and rudder are used to maintain directional control and coordinated flight. The maneuver is complete when wings are level at the horizon on the same heading as at entry.
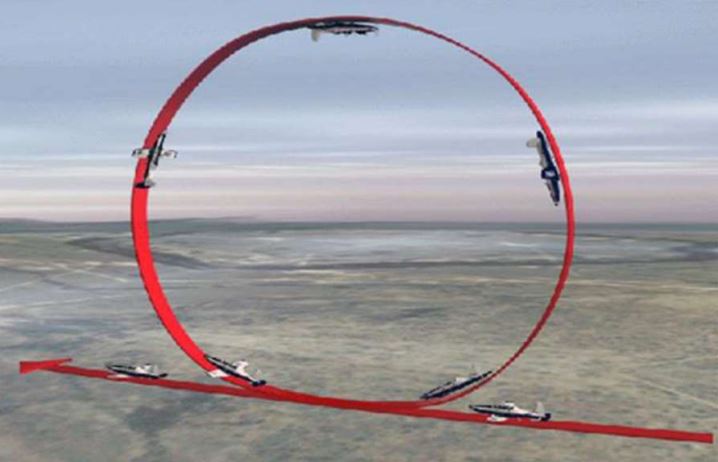
How to: Begin straight-and-level to 20 degrees nose low, with briefed entry airspeed and power setting. Smoothly pull the nose up using 3-4 Gs. When the forward view of the horizon disappears in the pull-up, maintain wings level (straight pull) by keeping the wingtips equidistant from the horizon. G loading decreases to maintain a constant nose track as airspeed decreases; however, aft control stick displacement increases. Right rudder pressure is required to keep the aircraft coordinated as airspeed decreases. Insufficient rudder as airspeed decreases may allow the nose to deviate up to 30 degrees off desired track. Airspeed should be approximately 100-120 KIAS wings level inverted at the top of the maneuver. Pull straight through the vertical and increase G loading to maintain a constant nose track until re-attaining a level flight attitude.
External Video
Cockpit Video
Cockpit "Look Around" Video
Immelman
Description: The objective of the Immelman is to complete a vertical, climbing, 180-degree turn with constant nose track. It consists of a half loop followed by a half roll, all flown in the same vertical plane. The maneuver is complete after a momentary pause in level flight with wings level on an opposite heading from entry.
How To: Begin in straight-and-level flight, with briefed entry airspeed and power setting. Smoothly pull the nose up using 3-4 Gs. When the forward view of the horizon disappears in the pull-up, maintain wings level (straight pull) by keeping the wingtips equidistant from the horizon. Back stick pressure and G loading decrease to maintain a constant nose track as airspeed decreases; however, aft control stick displacement increases. Moderate right rudder pressure is required to keep the aircraft coordinated as airspeed decreases. Insufficient rudder, as airspeed decreases, may allow the nose to deviate up to 30 degrees off desired track. As the aircraft reaches a point approximately 10 degrees above the horizon inverted (FCP canopy bow on the horizon), relax back stick pressure and apply aileron with coordinated rudder in either direction to initiate a roll to level flight. Airspeed should be approximately 100-120 KIAS upon completion of the maneuver. The maneuver is complete after a momentary pause in level flight following the rollout.
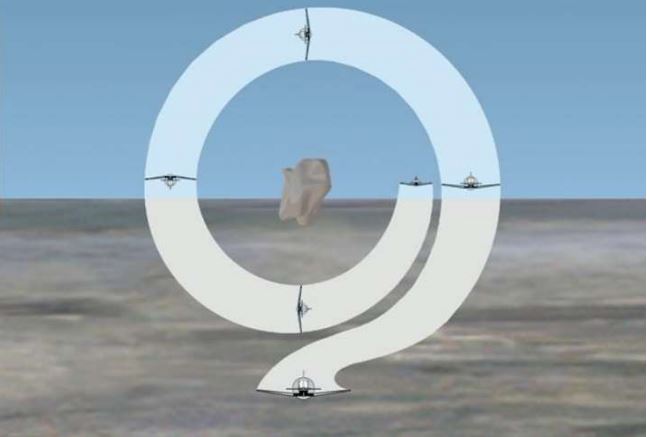
Split-S
Description: The Split-S combines the first half of an aileron roll with the last half of a loop, and can be thought of as a reverse Immelman. It demonstrates how much altitude is lost if recovery from inverted flight is attempted by pulling through the horizon. The aircraft climbs during entry and descends during recovery and is completed entirely in the same vertical plane. The maneuver is complete when the aircraft returns to level flight.
How To: Begin in straight-and-level flight. Raise the nose to an approximately 20-degrees nose high pitch attitude. Roll the aircraft to the wings-level, inverted attitude. Apply back pressure to bring the nose through the horizon. To avoid excessive G and airspeed at the bottom, attempt to max perform once the nose passes the horizon. Airspeed and G loading (approximately 3-4 Gs) increase during the pullout.
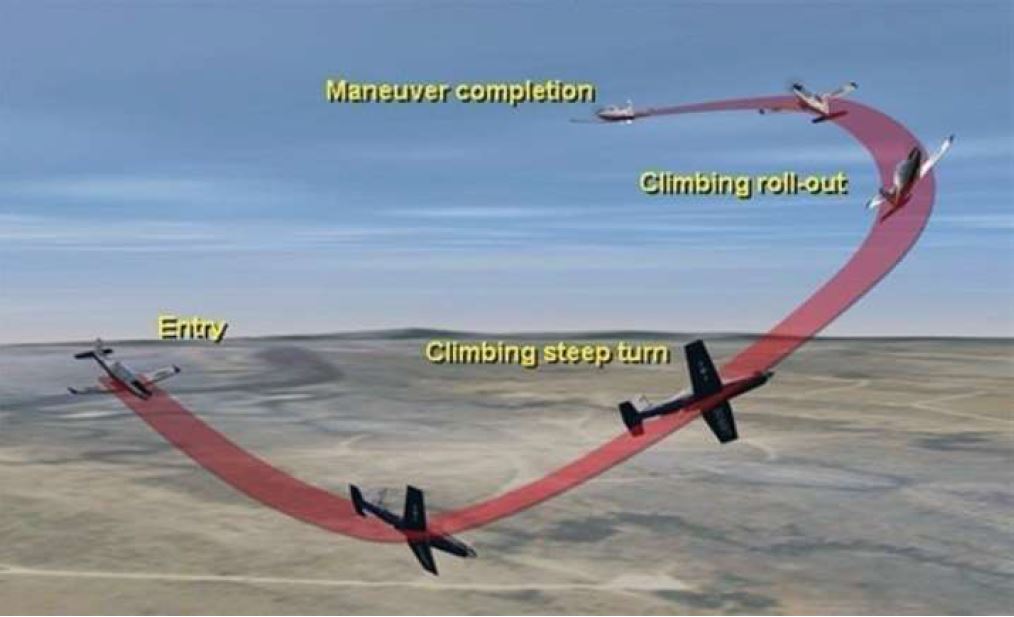
Chandelle
Description: The objective of a Chandelle is to gain maximum altitude during a 180-degree turn. Specifically, the Chandelle is a precision, constant bank 180-degree steep climbing turn that achieves a maximum gain of altitude for a given power setting. The maneuver is complete after 180 degrees of turn.
How To: Begin wings level, 15 degrees nose low with briefed power setting but below briefed entry airspeed. When airspeed reaches briefed entry airspeed, blend rudder, aileron, and elevator pressure simultaneously to begin a climbing turn, applying approximately 3 Gs. Increase bank to 60 degrees and keep the nose tracking up at a uniform rate. The nose should describe a straight line diagonal to the horizon. The nose should pass through the horizon at approximately 60 degrees bank with 30-45 degrees of turn complete. Check the amount of turn by using outside references. Once the nose is above the horizon, changes in pitch angle, airspeed, and the vertical component of lift require constant changes in control pressures and considerably more back stick pressure is required to keep the nose rising at a uniform rate. Aileron and/or rudder pressure opposite the direction of turn will be required in order to prevent overbanking. At the 135-degree point in the turn, start the rollout but keep the nose rising. Monitor the amount of turn remaining before reaching the 180-degree point by checking outside references. Time the rollout so the wings become level as the nose reaches the highest pitch attitude (approximately 40-45 degrees) at the 180-degree point. When the maneuver is complete (180 degrees of turn), lower the nose to the horizon or perform a nose-high recovery.
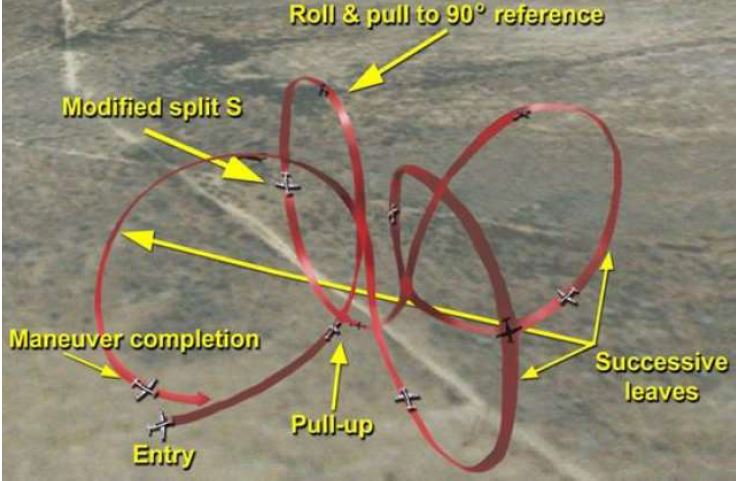
Cloverleaf
Description: The cloverleaf is composed of four identical maneuvers, each of which changes heading by 90 degrees. The pull-up is similar to the loop, although with less G loading. The top part is a rolling pull to the horizon 90 degrees displaced from the original heading (the first half of a barrel roll). The lower part or pull through is flown like a split-S. The maneuver is complete in level flight after four leaves in the same direction. Fewer than four leaves may be performed when practicing the maneuver.
How To: Begin in straight-and-level flight, with briefed entry airspeed and power setting. Pick a reference point 90 degrees off the nose in the desired direction. The initial part of the maneuver is a straight pull-up utilizing 2-3 Gs. As the aircraft reaches 45 degrees nose high (feet on the horizon), begin a coordinated roll toward the 90-degree reference point. Allow the nose to continue climbing during the roll so the maneuver is fairly slow and lazy. Coordinate the pull and roll so the nose passes through the reference point with the aircraft wings level, inverted, and at a relatively low airspeed (approximately 120 KIAS). Do not stare at the airspeed indicator, but note the airspeed at the inverted point. Consider discontinuing the maneuver if airspeed is above approximately 150-160 KIAS. Keep the wings level and pull through the bottom of the maneuver as in the split-S. To avoid excessive G and airspeed at the bottom, attempt to max perform (as in the split-S) once the nose passes the horizon. Approaching the horizon in the pull- through, reduce back pressure to allow acceleration to entry airspeed at the horizon. Complete three additional leaves in the same direction.
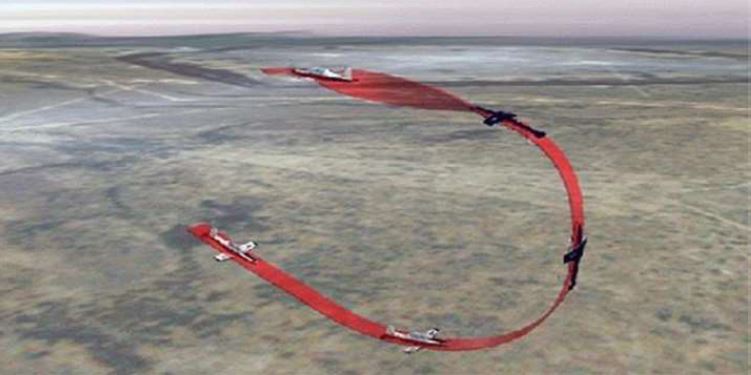
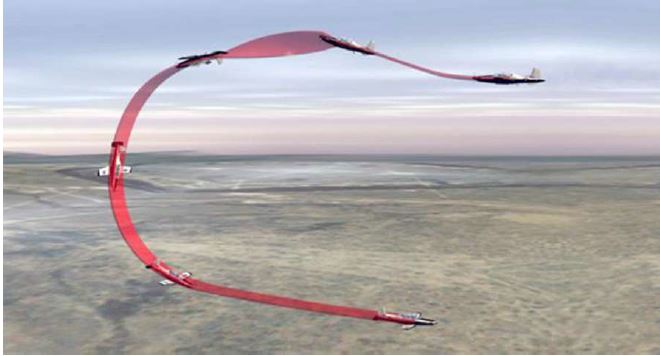
Lazy Eight
Description: The objective of the Lazy Eight is to maintain coordinated flight through two successive, symmetric, opposite direction turns that define the maneuver. This is a slow, lazy maneuver that describes a horizontal figure eight at the horizon. The horizon line bisects this figure eight lengthwise. Pitch, bank, and airspeed constantly change. The maneuver is complete after two 180-degree turns with the aircraft in level flight.
How To: Control pressure constantly changes due to changing bank, pitch, and airspeed. To help fly symmetrical leaves, select a prominent point on the horizon (90 degrees off aircraft heading; for example, off the shoulder) or a ground reference, such as a section line or road (perpendicular to aircraft). Selected points should be far enough from the aircraft (not beneath the wing) so your wings and fuselage don't completely obscure it from view. Mentally project an imaginary line from the aircraft to the horizon. Begin in straight-and-level flight with briefed entry airspeed and power setting. Select the desired reference point on the horizon or ground, and align the aircraft so the reference point is directly off a wingtip. Blend aileron, rudder, and elevator pressures simultaneously to start a gradual climbing turn in the direction of the reference point. The initial bank should be very shallow to prevent excessive turn rate. As the nose is raised, the airspeed decreases, causing the rate of turn to increase. Time the turn and pull-up so the nose reaches the highest pitch attitude (approximately 45 degrees) when the aircraft has turned 45 degrees or halfway to the reference point. Bank continues to increase as the nose falls. The aircraft should be pointed at the reference point as a maximum bank of 80-90 degrees is reached and the nose reaches the horizon. The lowest airspeed occurs just as the nose reaches the horizon (approximately 100 knots below entry airspeed). Avoid freezing the pitch or bank at the horizon. Passing the horizon, let the nose fall, and begin rolling out of bank. The second half of the leaf (nose below horizon) should be symmetric and approximately the same size as the first half (nose above the horizon). The bank should change at the same rate as during the nose-up portion of the leaf. When the aircraft has turned 135 degrees, the nose should be at its lowest attitude and the bank should be 45 degrees. Continue blending control stick and rudder pressure to simultaneously raise the nose and level the wings. Monitor the progress of the turn by checking the outside reference point (off opposite shoulder from maneuver start). The aircraft should be wings level at entry airspeed as the nose reaches the horizon, having completed 180 degrees of turn. Without pausing, begin the second leaf in the opposite direction of the first.
Cockpit Video
External Video
Traffic Pattern Stalls
Description: This exercise simulates five possible traffic pattern errors in order to practice the appropriate recovery actions:
- an overshooting (nose low), accelerated stall simulating overshooting crosswinds or improper perch spacing
- an undershooting stall simulating a combination of inadvertently placing the PCL to idle (zero torque) and poor airspeed crosscheck
- a landing attitude stall simulating an improper landing assured decision (PCL to idle) or improperly flown roundout and flare
- a break turn stall simulating an exaggerated aggressive break;
- a closed pull-up stall simulating an exaggerated, aggressive pullup with poor airspeed and altitude crosscheck
G-Awareness Exercise (GX)
Description: The G-awareness exercise should be a level or slightly descending turn, using maximum power. Begin the maneuver with sufficient airspeed to sustain 4 Gs. For planning purposes, use approximately 200-220 knots minimum for a level to slightly descending turn where the nose remains within 10 degrees of the horizon. The G-onset rate should be slow and smooth, allowing sufficient time to evaluate the effectiveness of the Anti-G Straining Maneuver (AGSM) and determine G tolerance. Increase Gs to approximately 4 Gs and maintain for approximately 4-5 breathing cycles in order to allow full cardiovascular response.
Cockpit Video
External Video
Intentional Spin (Active, awaiting validation)
Description: Enter an uncontrolled spin. The goal is to gain familiarity with spin characteristics and the three spin phases as well as to practice recovery procedures.
How to: Initiate entry at 120 Knots Indicated Airspeed (KIAS) minimum. Smoothly raise the nose to 15 to 40 degrees nose high with the power at IDLE. At 80 KIAS, apply full aft stick and full rudder in either direction simultaneously.
Power-On Stalls
Description: Aircraft pitch and bank angle held constant until control effectiveness lost indicated by uncommanded nose drop or unplanned rolling motion. Recover to a wings level, climbing attitude. An entry speed of 160 KIAS results in about 1,500-2,000 feet altitude gain.
How To: Smoothly raise the nose to 15 to 40 degrees nose high with the power set 30-60% torque. Set your bank to 0 degrees for a straight ahead stall and 20 to 30 degrees for a turning stall. Hold the pre-briefed pitch attitude using coordinated elevator, aileron, and rudder until encountering full stall, as indicated by loss of control effectiveness, unplanned rolling motion, or uncommanded nose drop. Upon stall indication, recover by advancing the power to MAX, relaxing back stick pressure to break the stall, and rolling the aircraft to wings level. Attempt to max-perform the recovery by minimizing altitude loss during recovery.
Slow Flight
Description: Operation of the aircraft at speeds close to stall which demonstrates aircraft handling characteristics in the landing phase of flight.
How To: Slow below 150 KIAS, configure the aircraft as briefed, and perform the before landing checklist. Maintain altitude as airspeed decreases. When target slow-flight airspeed is reached, adjust power to maintain airspeed and altitude. Trim as required.
Cockpit Video
External Video
Emergency Landing Pattern (ELP):
Forced Landing (FL) or Precautionary Emergency Landing (PEL)
Description: The 2 types of emergency landing pattern include Forced Landing (FL) and Precautionary Emergency Landing (PEL). FL is flown as if the engine is completely failed, so power is not available to correct energy problems. PEL is flown when engine failure may be imminent and power is still available. In both cases, the engine may be set to 4-6% torque to mimic the drag profile of a failed engine and feathered propeller.
How To: Execute Turn-Climb-Clean-Check (TCCC). Immediately begin a turn towards the nearest suitable airfield; 60 degrees of bank and 2G turns are typically used to avoid excessive energy loss but maximize turn rate. Zoom the aircraft to trade excess airspeed for altitude by executing a 2G pull-up to 20 degrees nose high. Hold 20 degrees nose high until 145 Knots Indicated Airspeed (KIAS), then lower the nose to maintain the desired glide airspeed. Arrive at high key (3000 ft above ground level) established in a glide at 125 KIAS. Excess energy may be dissipated using low engine power, slipping, geometry, or configuring the aircraft early.
Take-off (Rolling & Static, Active & Passive)
Description: There are 2 methods: Rolling & Static.
How To:
1. Static Takeoff: Stop the aircraft once it is aligned with runway centerline and the nose wheel is centered. After completing the Lineup checklist, advace power to maximum, release brakes, and use rudder to maintain the aircrat on centerline. At 85 knots, apply backstick pressure to rotate the nose to 7-10 degrees nose high. Raise the landing gear and flaps once safely climbing away from the runway with a good engine.
2. Rolling Takeoff: Same as static takeoff except that the aircraft does not come to a complete stop before beginning the takeoff roll. This is an expedited version of a Static Takeoff.
Straight-in Pattern (Active & Passive)
Description: Visual maneuver that aligns the aircraft with runway for a constant speed, constant rate descent and landing.
How To: Descend to 500 feet AGL before the 5-mile or 5-mile radar point. Slow to final approach speed once configured and before starting descent on glide path.
Vertical-S (A, B, C, D)
Description: There are 4 types of Instrument Vertical-S maneuvers including A, B, C, and D, which describe different profiles.
How To:
1. Vertical-S A: Maintain a constant heading while climbing at precisely 1000 feet per minute up for approximately 1000 feet of altitude gain followed by 1000 feet per minute down to return to the starting altitude. One climb and descent is typically considered one maneuver, but more or less may be performed to meet training objectives.
2. Vertical-S B: Same climb and descent profile as Vertical-S A except maintain continuous 30 degree of either left or right bank throughout the maneuver.
3. Vertical-S C: Same climb and descent profile as Vertical-S A except maintain either right or left bank through the climb, then reverse turn direction when transitioning from climb to descent. Do not reverse turn direction at the bottom of the maneuver.
4. Vertical-S D: Same climb and descent profile as Vertical-S A except maintain either right or left bank through the climb, then reverse turn direction both when changing from climb to descent and from descent to climb.